Rã¶Sti

Rã¶Sti

Rösti

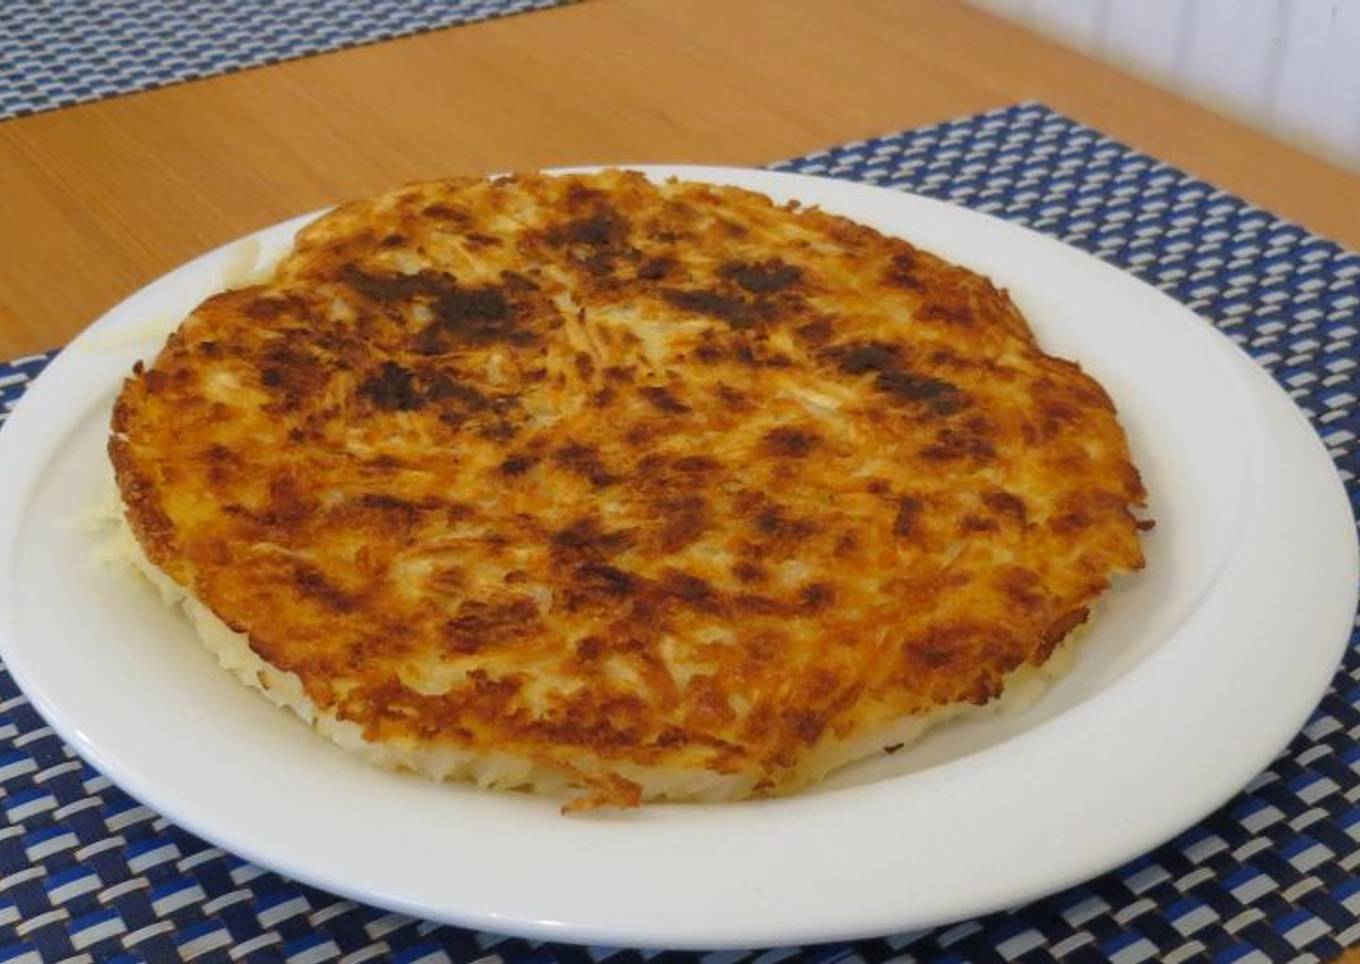
Hello everybody, I hope you are having an amazing day today. Today, we're going to make a special dish, Rösti. One of my favorites. For mine, I'm gonna make it a bit unique. This will be really delicious.

Rösti is one of the most well liked of recent trending meals in the world. It is simple, it's fast, it tastes delicious. It is appreciated by millions daily. They are fine and they look fantastic. Rösti is something that I have loved my entire life.

Many things affect the quality of taste from Rösti, starting from the type of ingredients, then the selection of fresh ingredients, the ability to cut dishes to how to make and serve them. Don't worry if you want to prepare Rösti delicious at home, because if you already know the trick then this dish can be used as an extraordinary special treat.

As for the number of servings that can be served to make Rösti is 1 servings. So make sure this portion is enough to serve for yourself and your beloved family.

To get started with this recipe, we must prepare a few components. You can have Rösti using 5 ingredients and 7 steps. Here is how you cook it.

This is really not hard to cook - basically, you just fry up some potatoes - but there's a thing or two you need to know before you can talk about rösti with Swiss people.

First of all, please don't call it the Swiss national dish. It's associated with the German-speaking part of the country, to the point that our main "competitors" the French-speaking Swiss are far less keen on it. The dividing line between the language regions is known as the "Rösti Ditch" and any Swiss-German politician talking about things like teaching English instead of French as the first foreign language will be accused of "digging the ditch".

It's pronounced r-uhhh-sti, with a long vowel, not "rusty".

In restaurants outside of Switzerland you might see it as a side, like chips. In Switzerland, it's a main dish and often fills your whole plate. It's not meant to be a fancy meal, it's what a farmer would eat in the evening after a long day's work, and it's among other things a way to use up left-over potatoes just like the English bubble&squeak - in fact, one Swiss recipe book I have describes the main ingredient as "left-over potatoes from yesterday evening"!

There are different variations associated with different cantons of Switzerland, for example:

Bern - with bacon
Zurich - with onions
Wallis - with tomato slices and raclette cheese
Appenzell - with Appenzeller cheese and herbs

Rösti with a fried egg on top is also popular throughout the German-speaking part of Switzerland.

Ingredients and spices that need to be Get to make Rösti:

  1. 250 g potatoes - preferably a kind like Charlotte that's good for boiling
  2. 1/2 tsp salt
  3. 1 tbsp butter
  4. 2 tbsp milk
  5. bacon, onions, cheese, tomatoes, fried egg etc. depending on the kind of Rösti you want

Instructions to make to make Rösti

  1. Boil the potatoes, ideally 1-2 days beforehand. Let them cool completely.
  2. Peel and grate the potatoes. Mix in the salt.
  3. Heat the butter in a non-stick frying pan.
  4. Add the potatoes and form a "cake". Sprinkle the milk on top.
  5. Once the rösti starts sizzling, reduce to a low heat, cover with a lid and leave to cook for around half an hour. Ideally you want a golden brown crust to develop below with no burnt patches.
  6. You can occasionally shake the pan to stop it sticking, but do not stir or turn the potatoes - you don't want to break up the rösti.
  7. Gently loosen with a spatula if necessary, then place your plate upside-down on the pan and turn the whole thing round so the crust at the bottom ends up on top.

As your experience as well as confidence grows, you will certainly discover that you have more natural control over your diet and adjust your diet plan to your individual preferences in time. Whether you want to serve a recipe that makes use of fewer or more components or is a little basically zesty, you can make easy changes to attain this goal. To put it simply, start making your dishes on schedule. As for basic cooking skills for beginners you do not need to discover them yet just if you understand some simple cooking methods.

This isn't a total overview to fast and also simple lunch dishes however its great food for thought. Hopefully this will get your creative juices moving so you can prepare delicious meals for your family without doing too many heavy meals on your trip.

So that is going to wrap it up with this exceptional food Steps to Prepare Speedy Rösti. Thank you very much for your time. I am sure you will make this at home. There is gonna be interesting food at home recipes coming up. Don't forget to save this page in your browser, and share it to your loved ones, friends and colleague. Thank you for reading. Go on get cooking!

My Pretty Boiled Egg Lunch

My Pretty Boiled Egg Lunch

My Pretty Boiled Egg Lunch

Hello everybody, it is Drew, welcome to my recipe site. Today, I'm gonna show you how to prepare a special dish, My Pretty Boiled Egg Lunch. One of my favorites. For mine, I'm gonna make it a bit unique. This is gonna smell and look delicious.

My Pretty Boiled Egg Lunch is one of the most well liked of recent trending foods on earth. It's enjoyed by millions every day. It's easy, it's quick, it tastes yummy. They are nice and they look wonderful. My Pretty Boiled Egg Lunch is something which I have loved my entire life.

Many things affect the quality of taste from My Pretty Boiled Egg Lunch, starting from the type of ingredients, then the selection of fresh ingredients, the ability to cut dishes to how to make and serve them. Don't worry if you want to prepare My Pretty Boiled Egg Lunch delicious at home, because if you already know the trick then this dish can be used as an extraordinary special treat.

As for the number of servings that can be served to make My Pretty Boiled Egg Lunch is 2 servings. So make sure this portion is enough to serve for yourself and your beloved family.

Just in addition, the time it takes to cook My Pretty Boiled Egg Lunch estimated approx 3 minutes.

To get started with this recipe, we have to first prepare a few ingredients. You can have My Pretty Boiled Egg Lunch using 8 ingredients and 8 steps. Here is how you cook it.

I had a craving for eggs hard boiled as i put them on to boil i went mooching in the fridge and my boiled eggs turned into this salad . Was really lovely. #Lunch

Ingredients and spices that need to be Make ready to make My Pretty Boiled Egg Lunch:

  1. 2 hard boiled eggs sliced
  2. 4 slices Halloumi Cheese grilled
  3. 8 Asparagus stems grilled in a little virgin olive oil
  4. 8-10 Slices Cucumber
  5. 8 slices tomatoe sliced
  6. 1/2 an Avocado sliced
  7. 1 handful Watercress for the bottom
  8. 1 mini red pepper sliced

Instructions to make to make My Pretty Boiled Egg Lunch

  1. Add your eggs to water and boil
  2. While boiling slice the tomatoes, peppers, avocado,cucumber
  3. Next grill the halloumi cheese
  4. Then grill the Asparagus
  5. When eggs are boiled add them to cold water wait for 1 minute then peel the shell off under cold water
  6. Add the watercress to the serving plate
  7. Then in two rows add one of each all the way down. Add the asparagus down the sides and middle.
  8. Finish with a little sea salt and a spray of virgin olive oil.

As your experience as well as self-confidence grows, you will locate that you have extra natural control over your diet as well as adjust your diet regimen to your individual preferences over time. Whether you wish to offer a recipe that uses less or even more active ingredients or is a little bit more or less zesty, you can make easy adjustments to achieve this goal. In other words, start making your dishes in a timely manner. When it comes to standard food preparation skills for novices you don't need to learn them but only if you master some straightforward cooking techniques.

This isn't a total overview to quick and simple lunch dishes however its great food for thought. With any luck this will obtain your innovative juices moving so you can prepare tasty meals for your household without doing too many heavy meals on your trip.

So that is going to wrap this up for this exceptional food Recipe of Speedy My Pretty Boiled Egg Lunch. Thanks so much for your time. I'm sure you can make this at home. There's gonna be more interesting food in home recipes coming up. Don't forget to bookmark this page on your browser, and share it to your family, colleague and friends. Thank you for reading. Go on get cooking!

My Large Taco Wraps Chicken, Chilli, +Veg

My Large Taco Wraps Chicken, Chilli, +Veg

My Large taco wraps chicken, chilli, +Veg

Hello everybody, hope you are having an incredible day today. Today, we're going to prepare a distinctive dish, My Large taco wraps chicken, chilli, +Veg. One of my favorites food recipes. This time, I am going to make it a little bit tasty. This is gonna smell and look delicious.

My Large taco wraps chicken, chilli, +Veg is one of the most favored of current trending meals in the world. It is easy, it's fast, it tastes yummy. It's enjoyed by millions daily. They're nice and they look fantastic. My Large taco wraps chicken, chilli, +Veg is something that I have loved my entire life.

Many things affect the quality of taste from My Large taco wraps chicken, chilli, +Veg, starting from the type of ingredients, then the selection of fresh ingredients, the ability to cut dishes to how to make and serve them. Don't worry if you want to prepare My Large taco wraps chicken, chilli, +Veg delicious at home, because if you already know the trick then this dish can be used as an extraordinary special treat.

As for the number of servings that can be served to make My Large taco wraps chicken, chilli, +Veg is 4 servings. So make sure this portion is enough to serve for yourself and your beloved family.

Just in addition, the time it takes to cook My Large taco wraps chicken, chilli, +Veg estimated approx 10 minutes fry.

To get started with this particular recipe, we have to prepare a few components. You can have My Large taco wraps chicken, chilli, +Veg using 19 ingredients and 21 steps. Here is how you cook it.

Thought of this instead of small taco,s use large wraps and they where perfect. You have to make sure you have free time to make these as the cutting and chopping of every veg takes longer than the cooking. Not much cooking really. It was gorgeous. I will not be doing this that often just as a treat. 😆 #Dinner #taco

Ingredients and spices that need to be Take to make My Large taco wraps chicken, chilli, +Veg:

  1. 3 Large chicken breasts cooked and chopped into small pieces
  2. 1/2 Medium sized onion chopped small
  3. 4 Cloves Garlic Crushed
  4. 1 Sweet Bell pepper cut up small
  5. 1/2 Green chilli pepper chopped small
  6. 1 carrot sliced very thin with a peeler
  7. 1/2 A Avocado chopped in very small pieces
  8. 8 Cherry tomatoes cut into 4
  9. 2 Long grilled peppers cut up small
  10. 1 cup sweetcorn
  11. 1 cup petite poi,s sweet peas
  12. 1 Cup Red Cabbage cut up small
  13. 1 Mug size Grated Chedder cheese
  14. 1 cup Courgette chopped small
  15. 1 tbls Mexican herbs
  16. 1 chicken dried stock cube
  17. 1 tbls tomato puree
  18. 2 tsp Chilli sauce that you like
  19. 4 large Wraps Tortillas

Instructions to make to make My Large taco wraps chicken, chilli, +Veg

  1. While the chicken is cooking add a the oil to a frying pan
  2. H the onions and fry for 1 minute
  3. Then add the Garlic mix in fry for 1 minute
  4. Add the chilli pepper salt and black pepper
  5. Next the corn and peas and mix together
  6. Next the Carrot shavings
  7. Then add the tomatoes mix in and the Avacado and red cabbage and fry for 5 minutes on low heat.
  8. Add the puree
  9. Add the chopped courgette
  10. Then add the chilli sauce
  11. Then add the sweet bell pepper and the roasted peppers
  12. Add 3/4 of the mug of grated cheese and stir in
  13. It will melt. Take off the heat and chop the cooked chicken
  14. Add 1 chicken stick cube crumblae into the mix and stir in.
  15. Add the chicken into the mix and stir it all in well.
  16. You need a deepish oven dish lined with grease proof paper so the wrap won't stick. Also the sides of the pan will hold the sides of the wraps upwards
  17. I steamed the chicken so its nice and tender and mixes in better
  18. Add the chicken and veg mix together in a bowl and stir in well mixed
  19. When the mix is shared wet a little all around the wrap that's lifted up to save it burning the edges. Add the little remaining cheese to each one.
  20. Add to a preheated oven 180C for 5 _8 minutes you just want to crisp it. Check after 5 minutes
  21. Add some sour cream along each one or yogurt or more chilli mixed with sour cream.

As your experience and also self-confidence grows, you will discover that you have more natural control over your diet plan as well as adapt your diet to your individual preferences in time. Whether you wish to offer a recipe that makes use of less or even more ingredients or is a little bit basically spicy, you can make straightforward changes to achieve this goal. To put it simply, begin making your dishes in a timely manner. When it comes to basic food preparation skills for beginners you do not need to discover them however only if you master some simple cooking methods.

This isn't a total overview to fast and also easy lunch recipes yet its great food for thought. Ideally this will get your innovative juices streaming so you can prepare tasty dishes for your family members without doing too many square meals on your trip.

So that is going to wrap it up for this exceptional food How to Make Ultimate My Large taco wraps chicken, chilli, +Veg. Thank you very much for your time. I'm sure you can make this at home. There's gonna be interesting food at home recipes coming up. Don't forget to bookmark this page on your browser, and share it to your loved ones, friends and colleague. Thank you for reading. Go on get cooking!

Baked Brunch

Baked Brunch

Baked Brunch

Hello everybody, hope you are having an incredible day today. Today, we're going to make a distinctive dish, Baked Brunch. One of my favorites food recipes. This time, I'm gonna make it a little bit unique. This is gonna smell and look delicious.

Baked Brunch is one of the most popular of recent trending meals on earth. It's simple, it is quick, it tastes yummy. It's enjoyed by millions daily. They are fine and they look wonderful. Baked Brunch is something that I have loved my whole life.

Many things affect the quality of taste from Baked Brunch, starting from the type of ingredients, then the selection of fresh ingredients, the ability to cut dishes to how to make and serve them. Don't worry if you want to prepare Baked Brunch delicious at home, because if you already know the trick then this dish can be used as an extraordinary special treat.

Just in addition, the time it takes to cook Baked Brunch estimated approx 20-30mins.

To begin with this recipe, we have to first prepare a few ingredients. You can cook Baked Brunch using 5 ingredients and 6 steps. Here is how you can achieve it.

#TastyTenDays
A pyrex dish is a foodie’s best friend!!
Easy as pie, a handful of tasty and healthy (or unhealthy) ingredients and voila brunch in a dish to go.

Ingredients and spices that need to be Get to make Baked Brunch:

  1. 2-3 tomatoes
  2. 2-3 eggs
  3. Handful mushrooms
  4. Handful feta cheese
  5. Sprinkle of oregano

Steps to make to make Baked Brunch

  1. You can play around with the base ingredients, tomatoes is always a staple place to start though. Works well with courgettes too, maybe even peppers. Either way you want something juicy and flavoursome.
  2. Preheat the oven 180 degrees. A splash of oil in your dish and in go the tomatoes.
  3. After thats in the dish lay something bulky ontop of that i have picked mushrooms here but if you fancy some carbs sweet potato should serve you well 👍
  4. Then in goes an arrangement of feta, i prefer greek here because of the subtlety of the flavour and its texture. Feel free to mix it up though.
  5. Next go the eggs, try to get the yolks fairly central and if need be swivel the dish around so the whites get a chance to fill in between the rest of the ingredients. Add a dusting of oregano to taste and into the oven it goes.
  6. Should take no longer than 20mins depending on your oven. Your looking for the whites to stay white but with a little crisp. Enjoy!

As your experience and confidence expands, you will discover that you have extra natural control over your diet as well as adapt your diet regimen to your individual preferences with time. Whether you want to serve a dish that uses less or even more active ingredients or is a bit essentially zesty, you can make simple adjustments to attain this goal. Simply put, start making your recipes on schedule. When it comes to fundamental food preparation abilities for beginners you do not need to learn them but only if you understand some simple cooking strategies.

This isn't a total overview to quick as well as very easy lunch dishes but its excellent food for thought. Hopefully this will get your imaginative juices moving so you can prepare delicious dishes for your family members without doing way too many heavy meals on your journey.

So that is going to wrap it up with this special food Simple Way to Prepare Super Quick Homemade Baked Brunch. Thank you very much for reading. I am confident that you can make this at home. There's gonna be interesting food in home recipes coming up. Remember to save this page in your browser, and share it to your family, colleague and friends. Thanks again for reading. Go on get cooking!

Ravioli - Spinach And Ricotta

Ravioli - Spinach And Ricotta

Ravioli - Spinach and Ricotta

Hey everyone, hope you are having an incredible day today. Today, I will show you a way to prepare a distinctive dish, Ravioli - Spinach and Ricotta. It is one of my favorites food recipes. For mine, I will make it a little bit tasty. This is gonna smell and look delicious.

Ravioli - Spinach and Ricotta is one of the most favored of recent trending foods in the world. It is enjoyed by millions every day. It is simple, it's quick, it tastes delicious. Ravioli - Spinach and Ricotta is something that I have loved my whole life. They are fine and they look wonderful.

Many things affect the quality of taste from Ravioli - Spinach and Ricotta, starting from the type of ingredients, then the selection of fresh ingredients, the ability to cut dishes to how to make and serve them. Don't worry if you want to prepare Ravioli - Spinach and Ricotta delicious at home, because if you already know the trick then this dish can be used as an extraordinary special treat.

To get started with this recipe, we must first prepare a few ingredients. You can cook Ravioli - Spinach and Ricotta using 11 ingredients and 16 steps. Here is how you can achieve that.

Delicious and easy pasta recipe

Ingredients and spices that need to be Make ready to make Ravioli - Spinach and Ricotta:

  1. 360 g flour
  2. 4 free range eggs
  3. 200 g spinach
  4. 200 g ricotta
  5. 40 g parmesan
  6. 1 lemon (grated zest only)
  7. 20 g sage leaves
  8. 1 garlic clove
  9. 100 g unsalted butter
  10. Sea salt
  11. Black pepper

Instructions to make to make Ravioli - Spinach and Ricotta

  1. Add flour, eggs and a large pinch of salt to a bowl and mix together. Knead the dough until it is smooth and stretchy.
  2. Divide dough in to 4 equal portions, wrap tightly in cling film and put in the fridge for at least 45 minutes.
  3. Cook the spinach in frying pan over a high heat until it is wilted.
  4. Drain the spinach in a sieve and ensure any excess water is removed so that the spinach is dry.
  5. Chop the spinach and add to a bowl with the ricotta, parmesan and lemon zest.
  6. Mix well after seasoning with salt and black pepper.
  7. Use a saucepan to cook the sage, garlic and butter by melting the butter and then simmering for 5 minutes before seasoning with salt and black pepper.
  8. Take a batch of dough at a time from the fridge, and lightly dust with flour. Flatten the dough until it is as wide as the pasta machine. Feed the dough through the pasta machine repeatedly and reduce the setting on the machine by 1 each time.
  9. Flour your worktop and then lay the rolled pasta on to this worktop. Place teaspoon size parts of the ricotta mix on to the pasta at equal intervals, using approximately a quarter of the mix. Ensure these are all down 1 side of the pasta.
  10. Use a pastry brush and water to dampen the pasta around the filling.
  11. Fold the pasta over the top of the ricotta and press down around each piece of ricotta. Ensure that all air pockets are pushed out.
  12. Trim the pasta down to even squares using a knife.
  13. Repeat steps 8-12 for the remaining 3 portions of pasta.
  14. Bring a pan of salted water to the boil (to cook the ravioli in), whilst warming the sage butter in a separate pan.
  15. Once the ravioli is cooked (should take approx 3 mins), remove with a slatted spoon and add to the sage butter pan.
  16. Stir gently before quickly removing to serve.

As your experience and also self-confidence grows, you will certainly locate that you have extra all-natural control over your diet regimen and also adapt your diet to your individual tastes with time. Whether you intend to offer a dish that makes use of less or even more components or is a little bit more or less spicy, you can make basic changes to achieve this goal. Simply put, begin making your recipes promptly. When it comes to standard food preparation skills for novices you don't need to discover them yet just if you grasp some simple cooking techniques.

This isn't a total guide to fast and also very easy lunch recipes however its good something to chew on. With any luck this will obtain your creative juices streaming so you can prepare delicious dishes for your family without doing way too many heavy meals on your trip.

So that's going to wrap this up for this exceptional food Recipe of Homemade Ravioli - Spinach and Ricotta. Thank you very much for your time. I'm confident that you will make this at home. There is gonna be more interesting food in home recipes coming up. Remember to save this page on your browser, and share it to your family, colleague and friends. Thank you for reading. Go on get cooking!

Tacos

Tacos

Tacos

Hello everybody, it's me, Dave, welcome to my recipe page. Today, we're going to make a distinctive dish, Tacos. One of my favorites food recipes. For mine, I am going to make it a bit unique. This is gonna smell and look delicious.

Tacos is one of the most favored of current trending meals on earth. It's enjoyed by millions daily. It is simple, it's fast, it tastes yummy. They're fine and they look fantastic. Tacos is something that I have loved my entire life.

Many things affect the quality of taste from Tacos, starting from the type of ingredients, then the selection of fresh ingredients, the ability to cut dishes to how to make and serve them. Don't worry if you want to prepare Tacos delicious at home, because if you already know the trick then this dish can be used as an extraordinary special treat.

As for the number of servings that can be served to make Tacos is 2-3 servings. So make sure this portion is enough to serve for yourself and your beloved family.

To begin with this particular recipe, we have to prepare a few ingredients. You can cook Tacos using 16 ingredients and 5 steps. Here is how you cook it.

Homemade wraps, filling and salad.

Ingredients and spices that need to be Take to make Tacos:

  1. 200 g flour
  2. 1 tsp baking powder
  3. 30 g butter
  4. 100 ml warm water
  5. 200 g mince beef
  6. 2 peppers
  7. 1 onion
  8. 1 garlic clove
  9. 1 tbsp paprika
  10. 1 tsp basil or parsley
  11. 1 carrot
  12. Oil
  13. Lemon juice
  14. A few jalapeños
  15. Salt and pepper
  16. Grated cheese

Steps to make to make Tacos

  1. For the wraps I added the flour to a bowl along with the baking powder. Add the butter to the bowl and rub it into the flour. You can now slowly add your water until it comes together. Put the dough on a floured board and knead until stretchy. Put it back in the bowl and cover for 20 mins. Divide the dough into 6 balls and put back in the bowl fir 10 mins. Roll flat on a floured board then fry in a dry frying pan until nice and toasty but still soft.
  2. For the filling. In a frying pan with a tiny bit of oil fry your chopped onion and garlic. Add the mice and fry till brown and then add your sliced peppers. Add your paprika powder salt pepper and herbs and fry for a minute. Add a splash of water and you're done.
  3. For the salad topping. Grate your carrot. Chop your jalapeños and add to the carrot. Season with salt pepper oil and lemon juice.
  4. To fork the taco shape put your wraps in between the spaces of the oven shelf and bake for 5-10 mins at 180 degrees.
  5. Now you can plate. Put your taco shells on the plate and add the mince filling followed by the carrot salad and top with grated cheese. Enjoy!

As your experience as well as confidence grows, you will discover that you have extra natural control over your diet plan and adapt your diet plan to your personal tastes over time. Whether you wish to offer a recipe that makes use of fewer or more active ingredients or is a little bit more or less hot, you can make easy modifications to accomplish this goal. Simply put, start making your recipes on time. When it comes to fundamental cooking abilities for beginners you don't require to learn them yet just if you master some simple food preparation techniques.

This isn't a total overview to fast and simple lunch recipes but its good something to chew on. With any luck this will get your innovative juices flowing so you can prepare tasty meals for your household without doing a lot of square meals on your journey.

So that's going to wrap it up with this exceptional food Simple Way to Prepare Super Quick Homemade Tacos. Thanks so much for your time. I'm sure that you will make this at home. There is gonna be more interesting food in home recipes coming up. Remember to save this page in your browser, and share it to your loved ones, colleague and friends. Thanks again for reading. Go on get cooking!

Pea Shoot Salad

Pea Shoot Salad

Pea Shoot Salad

Hello everybody, I hope you're having an incredible day today. Today, I will show you a way to make a distinctive dish, Pea Shoot Salad. It is one of my favorites food recipes. This time, I am going to make it a little bit tasty. This will be really delicious.

Pea Shoot Salad is one of the most well liked of current trending foods on earth. It is simple, it's quick, it tastes delicious. It's appreciated by millions daily. Pea Shoot Salad is something that I have loved my whole life. They are nice and they look wonderful.

Many things affect the quality of taste from Pea Shoot Salad, starting from the type of ingredients, then the selection of fresh ingredients, the ability to cut dishes to how to make and serve them. Don't worry if you want to prepare Pea Shoot Salad delicious at home, because if you already know the trick then this dish can be used as an extraordinary special treat.

As for the number of servings that can be served to make Pea Shoot Salad is 1 serving. So make sure this portion is enough to serve for yourself and your beloved family.

To begin with this particular recipe, we have to first prepare a few components. You can cook Pea Shoot Salad using 11 ingredients and 4 steps. Here is how you can achieve it.

Pea shoots have a delicious slightly sweet delicate flavour of peas... I think I prefer them to actual peas 😃... Also they are quite easy to
grow... and available to eat much earlier in the year than garden peas...

#salad #saladcontest

Ingredients and spices that need to be Make ready to make Pea Shoot Salad:

  1. Dressing
  2. Splash Olive Oil
  3. Splash Apple Cider Vinegar
  4. Splash Balsamic Vinegar
  5. 1 tsp Wholegrain Mustard
  6. Pinch Salt
  7. Black pepper
  8. Salad
  9. 4-5 Sticks celery
  10. Handful pea shoots
  11. 1 Mozzarella ball

Instructions to make to make Pea Shoot Salad

  1. Make the dressing... in a bowl
  2. Chop the celery, dress it in the bowl so it is nicely coated.. and add to the plate...
  3. Dress the pea shoots with a my leftover dressing... don’t use too much... it’s easy to overpower the pea flavour
  4. Top the celery with the pea shoots... slice the Mozzarella and arrange around the salad!

As your experience and confidence expands, you will certainly find that you have a lot more all-natural control over your diet as well as adapt your diet regimen to your personal tastes over time. Whether you wish to offer a recipe that makes use of fewer or even more components or is a bit more or less hot, you can make simple modifications to accomplish this goal. To put it simply, begin making your recipes in a timely manner. When it comes to standard cooking abilities for beginners you do not require to discover them yet just if you grasp some basic food preparation strategies.

This isn't a complete guide to quick and simple lunch recipes but its great something to chew on. Ideally this will obtain your imaginative juices streaming so you can prepare delicious meals for your family members without doing way too many heavy meals on your journey.

So that's going to wrap it up for this special food Recipe of Speedy Pea Shoot Salad. Thanks so much for reading. I'm confident that you can make this at home. There's gonna be interesting food at home recipes coming up. Remember to bookmark this page on your browser, and share it to your family, colleague and friends. Thanks again for reading. Go on get cooking!